Showing posts with label 101. Show all posts

Jul 26, 2011

African Violets 101 - Part 1

Part 1

Here are some photos of my African Violets to get things started off. I will get into more technical stuff later on, i.e. AV history, origins, Latin name, etc. (I use AV as an abbreviation for African Violet)
Photo #1: AV on a humidity tray in an eastern exposure – Note: the little chef to the right... I accidentally broke him =( I felt super bad about it after the fact. Dang!!!! =(

Photo #2: AV getting watered from below, the best way to guarantee that you don't accidentally get water on the leaves, causing spotting to your plants. This spotting cannot be removed once present. The only option is to completely remove the AV leaf! Make sure you also take the stem of the leaf as well. Leaving it attached the plant without the leaf will cause the stem to die and rot away. Not good! And not very flattering to your plant, either.

Photo #3: The group on the windowsill. These plants are all larger now, since these photos are at least a year old or more (I think, but I honestly am not sure!)

Photo #4: Baby AV plants, grown from 2 single violet leaves. There are several babies in this one pot, which later needed separating. I allowed baby AV's to grow freely in this same pot since I thought it would look cool and fuller with all the leaves. Only later did I find out how hard separating them was.

Take it from me – plant only one cutting (AV pup) per pot in the early growth stage. These are most commonly grown from stem tip cuttings taken from the mother plant. (Please see below for information on stem tip cuttings.) In short, it’s much easier to care for the cutting to start off if you keep it singular . =)

Note: Later, once your AV matures and blooms, you can group it with other AV’s for an attractive shock of color and beauty to add charm to any room! 2 or 3 plants to a container will do nicely.

Photo #5: Av's in bloom. I was at Trader Joe's with Mom one summer and they had 3 AV plants in the same pot, all blooming!! Each was a different color (white, purple, and pink, if I recall). I couldn't resist buying one (or three, that is.) Since this photo was taken, the plants have been separated into individual pots.

How to Root AV Leaves (Stem tip cuttings)


1. Find a healthy AV leaf that's a nice shade of green. Using sharp, clean scissors, snip it well below the leaf, leaving plenty of the juicy stem. (You can dip the cutting in rooting hormone if you desire, but personally I haven't had to do this. If you are impatient waiting for plants to root, however, this may be your best bet!)
2. Next, using well aerated soil, fill your chosen container just about to the top, with about a half inch of room to water (if you want to water from above).


3. Make sure it's equipped with a drainage hole! Please do not compress the soil! Using a pencil, or your finger, make a hole in the soil.


4. Stick the stem tip down into the hole, leaving some stem visible above the soil surface. Lightly firm up the soil around the cutting.


5. Go easy on the watering until roots begin to form (about 3-5 weeks, or more, depending on the location, humidity etc. The 'time-to-root-formation' will vary depending on whether or not you used rooting hormone.) To test the roots, give the cutting a gentle tug, but don't mangle it or rip it out! Soon you will begin to see little AV leaves creeping up around the cut stem. Try not to get water on them!


6. Once the baby plant looks fairly large (about 2 months, maybe less depending on humidity and light conditions) cut away the original leaf from the baby plant. Pot up in whatever container you like, or leave the baby in the current pot. The choice is yours! (Photo showing the old leaf completely removed. Plant is still small, but fully mature enough to bloom.)

In general, A high humidity room will help the cutting root faster, as well as assist your AV's by giving them a growth boost--mature plants, or otherwise. As for sunlight for your AV cutting, the best location would likely be wherever your other Av's are currently residing (probably an East or West window. My best friend keeps her Violet in a Northern window, and it's constantly in bloom. The choice is really a matter of personal preference.)

Warning! A Southern exposure will cook your AV. Yikes! NOTE. **If you are not sure what window faces which direction, get an expensive compass to help you locate true North, and go from there** With a bit of patience, you will have brand new AV's ready to pot up! More photos of my AV propagation are now posted above. =)

You can 're-use' the same AV leaf to grow multiple plants if you wish. Simply re-cut the same stem after removing it from the baby AV, and repeat steps 2-6. If the leaf has rotted or is no longer green, discard it.

Be persistant and do not give up! Not every cutting is sure to become a new plant! If you meet the proper conditions (and increase humidity) you will be successful! **Soil, watering and drainage is the key. Too much water = rotting plant. Poor soil = rotting plant due to lack of drainage, fungus gnats and more. Also, Too much sun = cooked plants. Keep at it and don't doubt yourself!!

More to come in African Violets in Part 2!

Jan 21, 2011

Lithops 101

Lithops spp. (Living Stones)

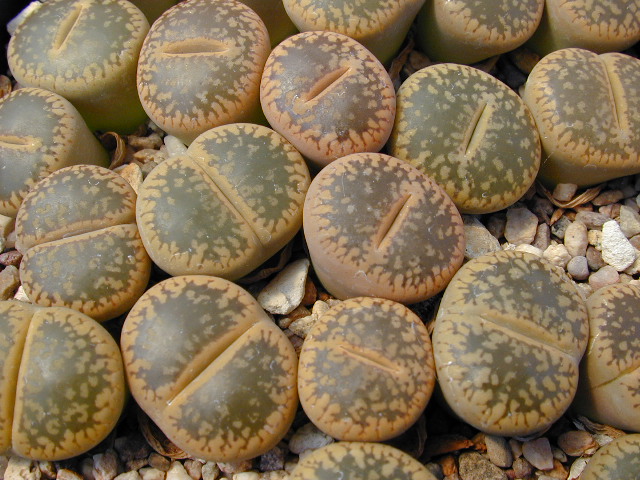
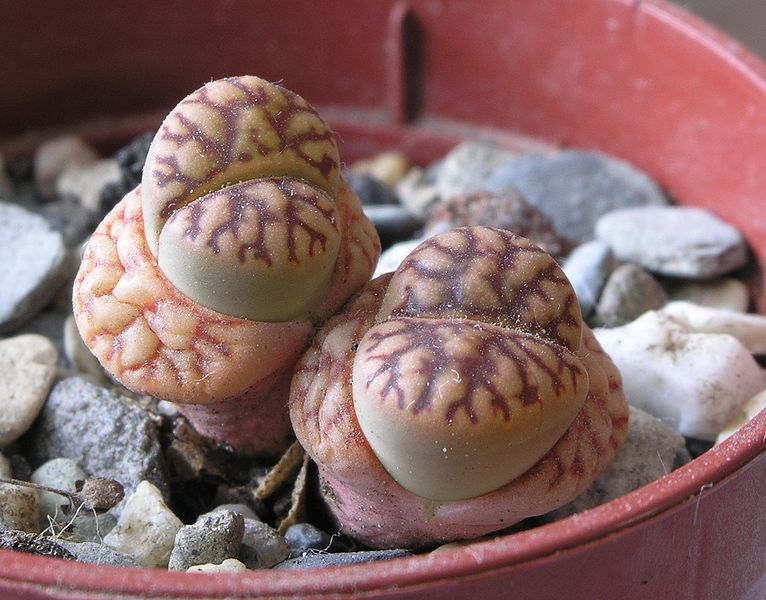
Lithops is a genus of succulent plants native to Southern Africa. "Lithos" means "stone" and "-ops" means "face" in Ancient Greek; therefore "Lithops" means "stone-like". The formation of the name from the Greek "ops" means that even a single plant is called a Lithops. This is a very good description of these plants, which avoid being eaten by blending in with surrounding rocks. They are also called ‘pebble plants’.

The genus Lithops is in the family of Aizoaceae, which also includes the various forms of plants known as "Ice Plants" and those called "Mimicry Plants". Lithops are commonly called Living Stones because of their remarkable resemblance to rocks on the ground. In a rock covered landscape, they are nearly indistinguishable from actual stones. In fact, the plant’s ability to blend in using its color and shape is the most startling adaptation of Living Stones. The leaves are not green as with many foliage plants, but various shades of cream, grey, brown, reddish browns, purplish browns, and grass-greens with a myriad of patterns such as darker windowed areas and designs, dots, red lines and areas known as "islands".

There are well over 300 types of Lithops. Several types differ in nearly all areas including texture, size and color. They may look similar, but are in fact very unique. No two Living Stone plants are going to look exactly alike. They are popular novelty house plants and many specialist succulent growers maintain collections.

Individual plants consist of one or more pairs of bulbous, nearly fused leaves opposite to each other and hardly any stem. The slit between the leaves contains the meristem and produces flowers and new leaves— leaves which are mostly buried below the surface of the soil. They have a characteristic top to the leaf which is a partially (or completely) translucent surface (or window) allowing light to enter the interior of the leaves for photosynthesis.

Lithops are extremely succulent bilobes (up to 90% water). A single body can be to 1.5" in diameter, and is split by a central "cleft", creating the "bi-lobed" body. Many species eventually form clusters, and in the native habitat, clusters gradually spread to from large colonies of Lithops that can span 6 feet in diameter. The rarer green forms occur naturally in grassy areas, while the browns, tans and other colors occur in quartz fields, providing an example of a phenomenon known as "mimicry" in which a plant, insect or animal can become almost completely camouflaged by its surroundings and is virtually undetectable. This ability to blend in helps Lithops avoid predators – The markings on the leaves disguise the plant in its surroundings from hungry animals that would otherwise feast on its tender, fleshy bodied leaves.

Climate: Lithops occur naturally across wide areas of Namibia and South Africa, as well as small bordering areas in Botswana and possibly Angola, from sea level to high mountains. Nearly a thousand individual populations are documented, each covering just a small area of dry grassland, veld, or bare rocky ground. Different Lithops species are preferentially found in particular environments, usually restricted to a particular type of rock. Lithops have not naturalized outside this region.

Rainfall in Lithops habitats ranges from approximately 700mm/year to near zero. Rainfall patterns range from exclusively summer rain to exclusively winter rain, with a few species relying almost entirely on dew formation for moisture. Temperatures are usually hot in summer and cool to cold in winter, but one species is found right at the coast with very moderate temperatures year round.

Lithops often survive many years of drought with nothing more than seasonal fogs. These plants have evolved a strategy that enables them to absorb and store moisture from these scant fogs. As our climate is much more humid than that of Africa, Lithops can absorb much of its required moisture from the air.

Growth Habit: Lithops tend to grow in the winter and rest in the summer, contrary to many other plants! During winter a new leaf pair, or occasionally more than one, grows inside the existing fused leaf pair. In spring the old leaf pair parts to reveal the new leaves and the old leaves will then dry up. The leaves may shrink and disappear below ground level during drought. Within their native habitat, plants almost never have more than one leaf pair per head, the environment is just too arid to support this. Yellow or white flowers emerge from the fissure between the leaves after the new leaf pair has fully matured, one per leaf pair. This is usually in autumn, but can be before the summer equinox in L. pseudotruncatella and after the winter equinox in L. optica. The flowers are often sweetly scented.

After the plant flowers, the plant will rest for a short time. Then from the middle again two new leaves will start to form. They will take all the moisture and nutrients from the old leaves. This is why it is important not to water/fertilize (it will disrupt the process). The old leaves will shrivel and die and the new ones will come in and replace the old ones. After that point in time it is safe to resume watering/fertilizing!

Lithops' fruit is a dry capsule that opens when it becomes wet; some seeds may be ejected by falling raindrops, and the capsule re-closes when it dries out. Capsules may also sometimes detach and be distributed intact, or may disintegrate after several years.

Summer Dormancy vs. Winter Growth: Normal treatment in mild temperate climates is to keep them completely dry during winter, watering only when the old leaves have dried up and been replaced by a new leaf pair. Watering continues through autumn when the plants flower and then stopped for winter. The best results are obtained with additional heat such as a greenhouse. In hotter climates, the plant will have a summer dormancy when they should be kept mostly dry, and they may require some water in winter. In tropical climates, Lithops can be grown primarily in winter with a long summer dormancy. In all conditions, Lithops will be most active and need most water during autumn and each species will flower at approximately the same time.

Soil Type: Lithops thrive best in a coarse, well-drained substrate. Any soil that retains too much water will cause the plants to burst their skins as they over-expand. Plants grown in strong light will develop hard strongly colored skins which are resistant to damage and rot, although persistent overwatering will still be fatal. Excessive heat will kill potted plants as they cannot cool themselves by transpiration and rely on staying buried in cool soil below the surface.

Lithops requires a porous soil; note that very excellent drainage can be attained by the addition of extra pumice or other coarse material. It is preferable that the soil does not contain much organic material, such as peat moss and that the plant is not fertilized with heavy nitrogen as this can cause an explosion of soft, flabby growth that can make the plant prone to bacterial rots. Another good mix would be 40% peat moss and 60% perlite to allow even faster drainage.

What pot should I use for my Living Stones? In my opinion, plastic or terracotta pots are best. Since Living Stones are a succulent, a terracotta pot will not only fit the succulent theme (sand, rocks, deserts, etc) but also might help the plant dry out a bit easier. Since terracotta is porous, water goes through it easily, helping the pot dry out as well as the plant – especially if it’s in a sunny location! You could also use a glazed pot if you desire. In design terms, a glass container would look striking and allow you to watch the plants’ roots grow and develop—a very cool idea, indeed! Just be sure the glass container has a drainage hole. Many glass containers do NOT normally have a drainage hole, so please be cautious!

Light: Lithops requires full to very bright sun (either direct or indirect). Shade will kill this plant! It can take full strength sun, but be mindful of sun burning the leaves (I know this from personal experience). If your plant is in full sun, be sure to water every week (instead of every two--see below).

A window facing West, South or East should do nicely. Too much light is not a problem for Living Stones. Too little light is! If the plant appears to be 'reaching' for the window or light source, it needs more light! Stretching will cause the Living Stones to lose their rock like appearance and grow taller. If this begins happening, simply find another place with more light.

In the wintertime during active growth, you may want to move Living Stones closer to a window – they need as much light as possible when producing new leaves. The rest of the year, they still need sufficient light, but even if they aren’t right next to a window, be sure they can get some bright sunlight. Where you place your plants really depends on your window access (a house may have several whereas an apartment or other place may have only one or two) and your available space for plants. If you’re already obsessed with plants, the chances are good your space may be limited! The good news is: Living Stones tend to be small kept singly or in clusters. Plants grow slowly and don’t need huge pots or containers. If your plant space is limited, Living Stones may be a plant for you!

Watering: Keep plants barely moist! Overwatering is the most common problem people have with Living Stones. Overwatering will result in the death of this plant 9 times out of 10. One Lithops expert once remarked in regard to watering Lithops: "When in doubt, don't". During the cold winter months, watering should be light and infrequent once again, until such as time as the days grow longer and the temperature begins to warm a bit.

Generally, Lithops will do best being watered about once every two or three weeks (when not in active growth or flowering). Tap water or distilled water is fine. Treat it as a cactus. The plant can take a 'misting' every other day if desired, but this is not required. Be sure not to overwater! It will take up all the water that is put in the pot, even if its too much!

This next part is very important!!  Keep in mind, watering requirements will change throughout the year depending on which season you are currently in!! Lithops is a very unique succulent with unique watering requirements. Since overwatering is the number one cause of death for Lithops, it’s imperative growers learn exactly when (and when not) to water. For this reason, keeping these plants alive takes a bit of time and skill!

Spring:
The plant is dormant now. Water only if the leaves appear wrinkled.


Summer:
During the hot summer months the plants will be dormant and watering should be light and infrequent, only enough should be given to prevent the plants from shriveling or appearing "wrinkled".

Fall:
After the hottest part of summer, as autumn approaches, the plant will use most of its stored energies to flower. The appearance of buds signals the start of another watering period. Plants should be watered enough during this time that the bodies remain turgid, or, in other words, do not become "wrinkled". Watering should be thorough, but less frequently than for other succulents.

After the flower dies off, ALL WATERING/FERTILIZING SHOULD BE STOPPED!!

Winter:
Water should be withheld as the new leaves begin to appear in the cleft during winter time. You must do this so that newly forming leaves are allowed to absorb the moisture from the old leaves, or the plant will be more prone to rot and the new plant formed will be smaller than before, rather than growing larger as it should. When it is apparent that the new leaves have absorbed the moisture from the old leaves ~ nothing but a dry husk will remain of the old leaves ~ that is the signal that it is time to begin watering normally again.

What happens if I overwater?
If you have consistently overwatered Living Stones, it will likely die, especially if planted in the wrong kind of soil (soil that retains lots of water, such as peat moss). If you’ve only overwatered once or twice, the plant will fill itself with water and ‘bulge’ out. Anymore water at this point can burst the leaves. Your best option is to withhold watering again until the leaves have once more reduced to normal size. Water thoroughly when soil is dry to the touch during the active growing periods. If the plant is shriveled during the non-growing periods, water a very little bit, just so the leaves perk up.

I repeat, if too much water is given at ANY time, the plant will swell and then split. If this happens, you cannot go back!! Take care when watering, and water sparingly. Take note of the seasons, and be confident in your Green Thumb!

Temperature: Living Stones will do fine in just about any temperature that it is given. Naturally found in the deserts of South Africa, the plant will do fine with hotter temperatures. Lithops are somewhat cold tolerant, but it is advisable to provide frost protection to prevent possible scarring. Colder temperatures are okay, but by no means ideal. Do not allow your plant to freeze. If this happens, the plant will die. Lithops prefers a wide spectrum of temperatures above 50 degrees, pushing into the 90-100 degree range (that being the absolute hottest the plant can handle). Ideally, you want your plant to thrive at a temperature around 65 to 75 degrees.

Flowering: Flowers appear from August to November, depending upon the species, and usually open in late afternoon, but open on multiple days. At this time, the plant is nearly obscured by flower heads to 1" in diameter that are composed of frilly, satiny yellow or white petals.

Living Stones will typically bloom in the fall. A blooming plant means it is at least 2 to 3 years old (juvenile plants cannot bloom since they need a ton of energy to do so). Only mature plants that are well cared for will bloom. Often times Living Stones only bloom in greenhouse environments or for professional growers. If your plant does bloom, it must like its location and current conditions! Daisy-like flowers of white or yellow last about a week and then die. Give the plant no water or fertilizer when it’s flowering, as this will interrupt the natural cycle (something you should avoid!)

Propagation: Propagation of Lithops is best done by seed or cuttings. Cuttings can only be used to produce new plants after a plant has naturally divided to form multiple heads, so most propagation is by seed. Lithops can readily be pollinated by hand, and seed will be ripe about 9 months later. Seed is easy to germinate, but the seedlings are small and vulnerable for the first year or two.

Fertilization: Fertilizer is a requirement that is of some debate with growers. To play it safe use a diluted amount of 20-20-20 plant food (about 1/4 strength) will be fine about once a month. Do not exceed this amount! After the plant flowers in late fall/early winter, no fertilizer should be applied to the plant until after the new growth comes in.

Reproduction: Living Stones will reproduce themselves by runner (a 'root' that will spread out). A new plant will come up (usually by the parent.)

Do’s and Dont’s:
Do not water or fertilize your plant when it is producing new leaves. This will disrupt the process which it needs to complete uninterrupted at this time.

Do not overwater your plant. It will swell and sometimes split. If this happens special chemicals will need to be applied so that bacteria does not enter the plant and cause it to die. If this is not done in time, the plant must be discarded and replaced.

Do give Lithops adequate fresh air and bright, indirect light. Full sun is excellent when and if the plant(s) are properly acclimated to the sunlight. If they have been grown in partial sun before being moved, move them steadily up to the window a little at a time over a period of about 2 weeks or so. By the end of 2 weeks, the plant will be fully acclimated to a full sun environment and will likely not sun burn!

In all, Lithops may seem like a daunting plant to successfully grow in the home, but with the proper education and patience, you can (and will) succeed. Pay attention closely to the watering requirements with this plant. I cannot over state this enough! If you have any questions about Lithops or other succulents, please email me at: espressomocha86@hotmail.com Please include pictures of the plant(s) in question if at all possible! Friend me on Facebook at: www.facebook.com/eirinn.cunningham

Leave me a comment below this post! I appreciate your readership!! I hope your day is truly amazing…May your plants enrich and restore your spirit!

Oct 16, 2010

Orchid Care 101

Orchids (Orchidaceae spp.) grow naturally in tropical environments like a rain forest. They are a  large group of flowering plants with over 22,000 known species, and are perhaps the second largest group of flowering plants in the world. Some orchids even grow on rocks near rivers or streams where they receive constant moisture. Orchids also grow dangling from the branches of trees. Over time, these beautiful plants have adapted to warm, humid places. The easiest way to care for orchids is to try mimicking these conditions as closely as possible in your home. 

They have a reputation for being difficult to care for, but given the  right conditions, and assuming their needs are well met, they can live for years just like any other exotic houseplant. What most people don’t realize is that orchids love water and humidity. Because of this, orchids need a good draining mix and lots of air circulation – both down in the roots and around the entire plant. Orchids DO NOT grow in potting soil – this would most assuredly kill them! Instead, they are grown in a light, airy bark mix and clay, terracotta or glazed pots. Orchid pots have holes throughout the pot, in order to let the plant's roots breathe.

Light
Most orchids love bright, indirect light (but not full sun). A southern window is the ideal location for most orchids, except Lady’s slipper and Moth orchids, which prefer less light (East or West facing windows are best). Place your orchids back a bit from the window to avoid direct sun.

Northern light would not be good for any type of orchid – In order to grow well they must have lots of bright light. Consequently, a northern exposure does not offer this important requirement. In case northern light is all you have, you can successfully grow orchids using only fluorescent lighting.

Watering
Although many orchid tags state “just three ice cubes every week” is enough water for your orchid, this is not true! Don’t believe it! The fact is, orchids need more water than just three measly ice cubes can provide.

That said, overwatering is probably the number one reason orchids (and in fact all houseplants) die. The second reason (magnified if the plant is already being overwatered) is lack of proper light. While watering your orchid isn’t an exact science, learning the needs of you particular plant will help you to better meet its watering needs. All orchids have slightly different needs. Even so, your best bet is to drench the plant and let it dry out slightly before the next watering. In general, it’s good to water your orchid every 7 - 10 days.

There are two good ways to water your orchid. The first is to bring it to the kitchen sink. Run it under water until the bark (or whichever growing media you have for your orchid) is thoroughly saturated. Drench well. It should drain freely – the last thing anybody wants is a soggy, wet orchid mix! These beauties need a steady supply of moisture. However, be careful not to overwater. It’s better to forget a watering than it is to water too much.

The second way you can water your orchid is: submerge the plant pot into a stock pot or bucket of room temperature water. The water level should come up to just above the lip of the pot. Leave the plant there for about 10 minutes. Take the orchid out of the bucket and allow it to drain thoroughly.

One symptom of underwatering is wrinkled leaves. If you notice the foliage wrinkling, try watering your orchid a bit more next time.

Symptoms of overwatering include yellowing foliage. If you notice this symptom, it means the roots are slowly rotting; the plant can’t handle too much water! Let it dry out thoroughly before you water again. However, yellowing leaves can also indicate underwatering, so try and keep track of how often (and how much) you water. I’m not asking you to measure the water out, just keep it in mind!

Checking the Moisture Level
Use a pencil (point side down) in the media to check the moisture level of the orchid. Leave it buried for about 10 minutes. If the pencil is dry on the end when you check it, you need to water the plant. If the pencil is moist, wait before you water again.

Humidity
Orchids love humidity since it reminds them of their natural growing conditions. There are several ways you can boost humidity around your orchid:

1. Use a humidity tray. These can be purchased specifically for orchids, African Violets, and other humidity-loving plants. Or, to save a trip to the plant shop – create your own humidity trays using a plastic drip tray filled with glass gems, stones, bark, or even sea shells. Set the orchid onto the stones, and then fill the tray to just beneath the bottom of the plant pot. Change out the water every two weeks and keep an eye out for empty trays… The more often you fill the tray, the better your orchid will do!

2. Mist your orchid whenever you water, or more even frequently if you live in a hot, dry place. If your home has very dry air, try misting daily

3. Use a humidifier in the same room as your plant. This will boost the ambient humidity around your plants, and they will reap the rewards! Leave it running whenever you feel your plants need a humidity boost
Use something like this tray filled with gems and shells (above), which also works well for African Violets. Of course, for your orchid you will surely need something a lot larger than what's above!

4. Group your orchids close together, even on the same humidity tray. The plants will benefit from the moisture expelled and take it in through their leaves

A Specialized Plant Part
Some orchids have a feature on the base of the plant called a psuedobulb, which stores water (exactly like cacti and succulents store water in their leaves). These orchid types love water. When you water, just drench the plant. Before you water again, allow the orchid to approach some level of dryness. This is very important, since psudobulb orchids will utilize the water they already have stored. A psudobulb is exactly like the hump on a camel’s back. Remember this fact the next time you water! (Keep in mind: some orchids don’t have a psudobulb, so it’s a good idea to look at the base of your orchid to see which type you have)

Media and Fertilizer
Orchid growing media is usually composed of some combination of: Fir bark, perlite, and charcoal. Occasionally you’ll see coconut husk fibers included in the mixture. Orchid planting mix/media will drain very generously. Fir bark is very low in nutrients, so your orchid will need to be fertilized with a balanced fertilizer (such as 20-20-20 or 10-10-10) from time to time to maintain its beautiful blooms and foliage. When fertilizing an orchid, please remember: a little goes a long way! Use a water soluble fertilizer every other time you water – even in the winter! Shock! You won’t hear me say that very often! Be sure to fertilize monthly in the wintertime.

Types of Orchids
There are many kinds of orchids available for you to choose from. If you have eastern or western facing windows where you already keep plants, your best choices are the Moth or Slipper Orchid variety (since these prefer less light). If you have a southern or western window, look for any of the other plants listed below. Florescent lights are also available if you don’t have a South, East or western exposure to take advantage of.

Buttonhole Orchid
(Epidendrum spp.)
Blooms: Clusters of small flowers
Light: Bright light is best
Water: Allow media to go slightly dry between waterings

Cactus Orchid
(Epiphyllum spp.)
Blooms: Large, bright flowers
Light: Medium to bright light is best
Water: Keep this plant barely moist at all times (slightly wet); water less than other orchids

Corsage Orchid
(Cattleya spp.)
Blooms: Big, frilled blooms used to make corsages, hence the name.
Light: Bright light is best. Direct sun in the morning is okay, with just a bit in the afternoon
Water: Allow media to go slightly dry between waterings

Clamshell Orchid
(Encyclia spp.)

Blooms: Clusters of numerous small flowers

Light: Bright light is best

Water: Allow media to go slightly dry between waterings

Cymbidium Orchid
(Cymbidium spp.)

Blooms
: Long lasting flowers, grass-like foliage

Light: Bright light is best

Water: Allow media to go slightly dry between waterings


Dancing Lady Orchid
(Oncidium spp.)

Blooms: This orchid’s flower actually looks like a little dancing lady in a dress, hence its name. The plant can produce up to 100 small blooms at once! Colors include red, white and yellow. The flowers have the scent of chocolate!
Light: Bright to intense light is best. Protect from direct sun if placed outdoors in the summertime
Water: Allow media to go slightly dry between waterings. Can have pseudobulbs.

Dens, Spray Orchids
(Dendrobium hybrids)
Blooms: Attractive flowers last for weeks at a time. Yellow, red, pink, or violet colors.
Light: Bright to intense light is best.
Water: Allow media to go slightly dry between waterings. Keep in mind their cane-like stems store water! Some varieties also have pseudobulbs.

Jewel Orchid
(Ludisia discolor)
Blooms: Maroon colored leaves with silver veins
Light: Medium light is best
Water: Keep plant evenly moist (drench, then water again just before the media dries out on top)

Moth Orchid
(Phalaenopsis spp.)
Blooms: Flowers last 6 weeks or longer and come in colors of white, pink or yellow, with a network of colorful veins throughout the petals. The flowers are moth shaped, hence the name
Light: Medium to bright; less light than most other orchids. Place the plant in an eastern or western exposure
Water: Allow media to go dry (about 1 inch below the surface) between waterings

Odontoglossum Orchid
(Odontoglossum spp.)
Blooms: Dramatic arching flower spray
Light: Bright light is best
Water: Allow media to go slightly dry between waterings

Lady’s Slipper Orchid
(Paphiopedilun spp.)
Blooms: The blooms include a pouch which looks like a slipper, giving this orchid its name. Blooms can last for 8 weeks, sometimes more. Strap-like leaves with large, waxy flowers. Comes in pink, brown, or white colors.
Light: Needs less light than most other orchids, on the moderate side. An eastern or western exposure will do nicely. Protect from direct sun if placed outdoors in the summertime
Water: Allow media to go slightly dry between waterings

Spider Orchid
(Brassia spp.)
Blooms: Spider-like flowers with graceful stems
Light: Bright to intense light is best
Water: Allow media to go slightly dry between waterings

Tailed Orchid
(Masdevallia spp.)
Blooms: Showy tailed flowers
Light: Medium to bright light is best
Water: Keep plant barely moist at all times

Vanda Orchid
(Vanda hybrids)
Blooms: Large long lasting flowers
Light: Bright to intense light is best
Water: Allow media to go dry between waterings

This post was made especially for one of my readers, Joe's Blog, who asked me a question about her orchid. Thanks for reading! And to all of you, good luck caring for and selecting your orchids! Have an awesome day =)

Oct 15, 2010

Lucky Bamboo 101

Lucky Bamboo (Dracaena sanderiana) is actually a member of the Dracaena family, and is not really bamboo at all. The kind of bamboo people confuse it with is in fact a grass which is eaten by pandas in Asia. They do look very similar, though! This type of Dracaena is a popular houseplant. Legend has it this plant will bring good luck to your home and family.

Most Lucky Bamboo plants are sold potted in clear glass containers with decorative glass gems all around the roots. These are ideal since they are pretty to look at, and they help hold your plant up! If you see Lucky Bamboo sold another way (i.e. in soil, bare root) try to look for little glass gems at the dollar store or online to help hold up your plant. Stones or pebbles also work for this. Simply repot the plant into a glass container with water instead of soil. (Lucky Bamboo potted in water is easier to care for than one in soil -- due to the fact that soils carry bacteria and many fungal diseases).

If your Lucky Bamboo container or pot hasn’t been cleaned out in a while, it’s a good idea to do from time to time, both for cleanliness reasons and the health of your plant. As the plant gets larger, its roots will grow longer and begin to fill the pot. It’s a good idea to give these leggy roots a trim. Also, because this plant is (usually) potted in water alone, algae will build up over time on the inside of the container and must be cleaned properly.

Read on to find out how to change the water and clean out your bamboo pot!

You'll need:

Lucky Bamboo
A large bowl
A cup with high sides
Scissors
Your kitchen sink (or a place with running water)
Soap and water
Clean water for your plant


1. Lightly grasp your bamboo in one hand (see above).

2. Hold plant pot over the bowl.


3. Gently pull bamboo out of the container. Let all glass gems/stones fall into the bowl. Next, clear off all gems from plant roots.


4. Set bamboo into the cup (right); high sides prevent your plant from toppling over. Set aside.

5. Rinse out the container with soap and warm water. Next, rinse gems or stones free of any debris.

This step helps remove algae buildup and refreshes your gems (which surround the plant and are in direct contact with it); It is important the gems and container remain clean so bacteria doesn’t harm your plant! Changing the water periodically is also useful in preventing plant diseases.

6. If needed (using scissors) trim excessively long roots to a uniform length. You can remove up to (but no more than) 1/3 of the plants’ roots. Doing this keeps the plant from sucking down a whole ton of water, and also makes it aesthetically pleasing when displayed in glass containers.


7. Replace plant into the clean container. Hold the stalks straight and make sure they are centered.


8. Then, replace gems around the roots and stalks to stabilize the plant

9. Finally, water your bamboo with clean water (at room temp). Be sure to change the water every 3 weeks or so and always keep the roots covered in water!

General Care
Give Lucky Bamboo good light, but not direct sun; this will kill your plant! A western or eastern facing window works very well. Keep an eye out for any spotting or discoloration of the stalks. If you notice this, it means one of two things: either too much water, or the plant is getting too much sun. Fill the container with less water and move the plant to a less sunny location.

Watering and Your Container Size
Depending on the container size, the plant may need more or less water. Clear glass containers work well to help you keep track of the water level. For example, if your plant is small (less than 5” tall) the container won’t need to be filled to the top. If your plant is larger (7-10” tall or taller) you can safely fill the container to the top. (Be careful if the stalks are mostly inside the pot -- filling it with water all the way can cause rotting. If, on the other hand, the stalks are completely above the pot and not really inside [that is, underwater], your bamboo will be safe from rotting)

So generally speaking,
Shallow container – fill to top with water
Deep container – cover roots and fill about ¾ way up

Keep in mind, there are exceptions to this rule; I'm speaking generally here! Be careful when watering, but always keep roots covered. The leaves tend to get a bit dusty, so rinse them off occasionally. Yellowing of leaves does happen sometimes. I find this to be a normal occurrence with Lucky Bamboo. Simply trim them off with scissors to keep it looking nice!


Problems
One of the major mistakes people make with Lucky Bamboo is letting the roots dry out. Although the plant can stay alive for weeks (sometimes months) in a dry state, the plant needs regular watering to thrive. On the other hand, I have seen bamboo get too much water – this causes the stalks to turn yellow and rot. Once this happens, the only option is to buy another plant!

I hope this little guide will provide you with some tips on care and maintenance for your plant. If anyone has questions or comments, please let me know!

Oct 12, 2010

Peace Lily 101

Here are some basic tips for keeping your Peace Lily looking its very best:

1 - Keep the plant evenly moist (not dry to the touch, not soggy, but lightly damp)

2 - Water Peace Lily frequently

3 - Fertilize each time you water for increased flowering production

4 - Wipe leaves clean with a damp cloth or sponge

5 - Shower or rinse this plant monthly, but especially in the spring and summer

6 - Remove the flowers when they turn green

7 - Avoid leaf tipping by watering only with distilled water or filtered

8 - Trim the leaves to mimic natural leaf shape without cutting into healthy green tissue

9 - Repot into any good potting soil. Amend soil with sharp sand (aka builders' sand) for increased drainage

10 - Do give the plant ample light but not full sun

11 - Avoid shaded areas!

12 - Do display as a centerpiece (in any room you'd like) in a decorative or seasonal pot

13 - Slightly rootbound conditions may help flowering

Oct 2, 2010

Snake Plant 101 - Taking 'Easy' to a New Level

Snake plant (Sansevieria), A.K.A Mother-In-Law’s Tongue, is a succulent plant, which means the leaves retain lots of water, similar to a cactus. You can recognize snake plants by their long, pointed, upright leaves which look very much like snakes, giving the plant its name. It is green in color, but sometimes has yellow edges.

1) When it’s time to buy a new plant, be sure to select a healthy looking plant that is a deep green. Pale leaves mean the plant may already be suffering at the store, and there’s no reason to waste your money on snake plant that’s growing poorly before you even get it home!

2) Often times when you buy a new houseplant, you should repot it into a new pot with fresh soil ASAP. If the roots appear above the soil, the plant definitely needs to be repotted. Also, if the pot from the store is simply a cheap plastic pot, I recommend you repot your new plant. It will be much happier that way!

3) Give snake plant sufficient light. The plant will thrive in a sunny window facing east, west or south. If you have only a north facing window, don’t despair! Snake plant handles a variety of light situations very well. If you can only provide minimal light, the plant will be fine. Later, when the opportunity presents itself, move snake plant to a sunnier window. The more sun it gets, the faster it will grow!

4) Water sparingly. A succulent holds lots of water inside its leaves, and if you give it too much water, the plant will rot. By sparingly, I mean water every two to three weeks (In the summer time, the plant will use more water, especially if it's in a very sunny location. In winter, the plant uses less water, so be sure to adjust accordingly). Use room temperature water so the roots don’t get shocked. Wet the top of the soil thoroughly, but be sure not to drown the plant! You are better off watering the plant too little than too much!

5) Feed the plant with a tiny amount of general all purpose plant food (the kind you dissolve in water) in the spring and summer. Because this is the primary growing time for snake plant, it will thank you for the extra growth boost the fertilizer provides. Put the fertilizer in your favorite watering jug, and just fertilize every time you water. In fall and winter, stop fertilizing – snake plant doesn’t need to be fed at this time of year.

6) Snake plant is extremely forgiving, and in fact will thrive more on neglect rather than too much attention. If you miss a watering, don’t worry! Water the next time you remember. Snake plant will survive in low light conditions, or even full sun! Therefore, snake plant is one of the most common and easy-to-care-for plants you can buy.

Important tip: As I already mentioned, do not overwater! The plant will die if it can’t absorb excess water in the pot. Overwatering is the number one cause of plant death!

If you be sure to give good light and small amounts of water to snake plant about every two to three weeks, it will prosper and bring you joy for many years!

Jul 20, 2010

Norfolk Island Pine 101

You might've seen a Norfolk Island Pine (Araucaria heterophylla) for sale at your local grocery store around Christmas or Yule time. They are often sold as miniature Christmas trees - some people even decorate them in place of a full sized tree! I bought my Norfolk at the nearby Kroger. I saw them, and I couldn't resist having one. They make a great addition to your plant collection, and help to put you into the spirit of the season. However, they can be a little tricky in the care department.

Water. Norfolks like to be kept lightly moist at all times. Make sure the pot allows for good drainage. Letting the soil dry out even just a little is a bad idea - the plant will shed its needles and they won't grow back! Make sure to water when the top 1/2" feels dry to the touch.

Light. Give Norfolk a bright location, but avoid full sun. A West or East location should do nicely! Avoid long exposure to extreme cold, heat, or wind.

Humidity. Mist the plant regularly to prevent yellowing of leaves and keep them green. Yellowing of older leaves at the base of the stem is normal - trim away dead leaves with scissors or pinch between thumb and index, lightly pulling until the leaf comes free.

Pot types and sizes. The best kind of pot for Norfolks is plastic, since they are versatile, durable, and come in attractive colors. If you'd prefer something in the glazed category, there's a better selection to be had as far as designs on the pot itself. Glazed pots are heavier, and will accommodate larger plants if you have them for a long time. I would definitely avoid a terracotta pot, due to their reputation for drying out quickly. If you repot the plant when you get it home, a little broken pottery or stones on the bottom of your pot will help greatly improve drainability.

Display Tips. If you find a small tree at the grocery store and decide to decorate it for the holidays, be mindful of the branches - they can break if too much weight is put on them! A small string of lights, a garland, and maybe a few small ornaments should be ok...just don't overdo it! Norfolks make a nice centerpiece on a mantle, end table, or kitchen table anytime of the year. Their simple elegance will add charm to any room in the house!

The #1 thing to remember when you buy a Norfolk: on the way out the door with your brand new plant (in the middle of December), remember to cover the plant with an extra bag! Arctic weather is a sure way to kill your plant! Oh darn!